Monday 29 December 2008


Firstly, may I wish all readers a very happy and peaceful Christmas season. I haven't posted since the 12th as I realised it would not be good if people who read the blog saw their own Christmas card proudly displayed before it even arrived!! The little stocking ornament I made for my nephews' Christmas tree was much appreciated. When we visited them on the 14th of December, the tree was installed and we were able to hang it on the branches where it looked very happy. I was also very pleased with the way the little seed beads caught the light and twinkled. Attached are two cards I made. The cross-stitched one is for Andrew's sister and family, and features that Christmas perennial, the over-large knitted jumper. I loved stitching it, and the finished card looked great. I substituted red seed beads for the holly berries on the jumper to give a bit more texture and they looked fine. The tree card was for my in-laws and I like these cool colours as a change sometimes from the more traditional bright reds and greens.
For some reason (probably sheer untidiness) I couldn't find the envelope that went with the card, so I used some scrapbook paper to make one. Fortunately I was able to find one with blue and silver snowflakes that worked really well.
Now I'm busy stitching thank you cards for gifts received. I've also resumed my ATCs - these sadly took a back seat in December due to time taken by Christmas preparations in their many forms. Just why for instance does present wrapping take so long? Maybe I'm doing it wrong, and we certainly don't have a huge number of gifts to buy, but it seemed to take hours! Anyway, I attach a picture of the last ATC of the year, which is a DoCrafts swap to raise funds for the charity "Help for Heroes". This worthy charity raises funds for wounded service personnel. Sometimes, in the controversy over the actions in Iraq and Afghanistan, it's easy to forget our brave men and women who are serving in such difficult conditions. I also think it's important they understand that the majority of the British public support our troops, even if we don't always agree with the politicians who send them into battle. Anyway, these little ATCs should be themed on either the Army, Navy or Air Force. I picked the RAF as my brother served in it for a number of years and focused on the ensign and badge with the full heraldic description. I love the words used such as sinister for looking to the left - it sounds so wonderfully gothic. Each ATC is then sent to the lady organising the swap, with a coin attached to the back. These will then be removed before posting out the swapped cards and donated to HFH. What a great idea and how nice to have fun with a hobby and help a charity at the same time.

Another swap I'll be doing shortly is on the theme of birds, and the lady organising that one has requested used postal stamps to accompany any cards. The reason is that the RSPB (Royal Society for the Protection of Birds) is having a stamp collection to raise funds for its conservation work, hence the decision to have a birds theme for the ATC concerned. So I now have a little freezer bag on the bedroom windowsill which is steadily filling with stamps torn off envelopes.
Andrew's parents are visiting us shortly for the New Year festivities, so after that I'll be scrapbooking the Christmas festivities. I also have another very special scrapbook task. My oldest friend Liz (we grew up together) has three beautiful children. The eldest, Sarah will be 18 in January. The last time she visited me (she often comes to stay) she mentioned that she did not have many pics of her childhood. So I'm making her a scrapbook of just that, from when she was a tiny baby to a gorgeous grown up Goth girl. I called in on Liz on Sunday and she entrusted me with Sarah's baby album and another album of photos of her and her sister as tinies. This alongside all my pics will form the contents. I've just invested in a bunch of photo credits on an online photoprinting store so will be uploading and printing via that, as printing lots of photos at home is very expensive.
Finally, I was thrilled with the success of my Christmas card offer. The furthest went all the way to America, and amazingly got there in time, even though I was rather late in posting it. Emboldened by this, I'd now like to extend the offer to birthday cards through the year. If you would like a handmade birthday card from me this year, just send me an email and I'll oblige. The more notice the better!!

Thursday 11 December 2008


To begin at the beginning.... A little while ago, I bought a combined cross-stitch magazine and goodie pack called Cross stitch for Christmas. As well as nice range of small patterns it had a big pile of free threads, aida, ornaments for the tree, needle and ribbon as well as some blank cards. It looked good so I treated myself. I've now stitched two patterns from the magazine - one to go on a Christmas card, a Margaret Sherry design, who is a very well known designer and another one, shaped like a stocking to go as a Christmas tree ornament. This is destined to be a gift for Andrew's sister and family when we see them over the weekend. The cautionary part of this tale is NEVER BUY CHEAP THREADS (FLOSS). I used the threads in the goodie pack and they were not one of the big three brands (DMC, Anchor or Madeira). They were horribly thin, not very shiny and plump and kept snagging and knotting. Generally, I cross-stitch in two strands, but these were so thin, I stitched in three. For the stocking, I used one of my own lilac threads, a DMC one, and the relief was amazing. Fine, smooth cotton that glided through the aida, and lay plumply glistening on the design. I will probably throw the others out, very reluctantly as I hate throwing stuff away, but life is simply too short to tolerate such poor quality stitching stuff.


A picture of the stocking is attached - as you can see, I added seed beads to it - a pretty holographic clear one that I bought a packet of, along with some red and some gold. The red are used on a card I made for Penny, a greyhound friend. Here I x-stitched a simple red star, and added red seed beads. Mounted in a red card, I then added some Christmas borders and peel-offs to give a cheerful and simple card. Penny runs a company that does medieval re-enactments, and we often see Joe her business partner when we visit her on the farm or at shows. I made him a card, pictured, which tried to pick up on the medieval theme. I used a tall red pearlescent card, with a strip of patterned red Anna Griffin paper in the centre. Then I mounted a gold card with rounded corners and added an epoxy sticker of a knight on horseback and a stag. Below, I added a red label bearing the words "Noble prince" applied using rub-ons. I'm waiting to hear of any feedback.


I also attach a pic of the birthday card I made for my mother-in-law's birthday, which is today - happy birthday Rita! Again, a fairly simple x-stitched card, with a small Joan Elliott design (I absolutely love her stuff). She is very fond of beads and French knots. I still have not conquered my fear of the French knot and avoid them wherever possible, although I am a recent and enthusiastic convert to the use of beads. This pretty little floral design was best left fairly unadorned so I simply added a birthday greeting and a butterfly. Sometimes with cards, the best thing is to leave well alone and know when to stop adding stuff.

Wednesday 26 November 2008

Christmas Card Giveaway - yes, it's here. All you need to do is send me an email to silvernutmeg@btinternet.com with your address and I'll send you a handmade Christmas card or ATC. If you're particularly persuasive, I'll even send you both! I've put the same invitation on my other blog, and am hoping for a good response.

Tuesday 25 November 2008


A little pre-Christmas project. Andrew's parents have a very good friend, who they went to school with. Over the years we've kept in touch with her too, and I was going to do a letter and some photos with her Christmas card. But really, once you've got two or three photos, you're halfway to a minibook, and in my bottomless Brenda Pinnick kit, there were some very pretty little minibooks just crying out to be used. So, off I went today. I selected a variety of nice photos to pick up some of the news and activities since we last saw her in May. The minibook is very pretty with six pocket pages. You can do the traditional embellishments on the front and back of the pages, but of course you also have pretty little pocket inserts that you lift out by a piece of ribbon - ideal for a photo. I added text that I did in a Word text box, just to give some little notes and context to the pictures. The book itself is very pretty and didn't need a huge amount of embellishing, but I added a few nice little flowers and so on. Photos attached of the book, which I hope she'll like. Tomorrow, I'll be making a card, then wrapping and sending.

Thursday 20 November 2008


Well, some photos to post tonight. A few ATC swaps on the go. I've done a Snowman swap - we're now getting into that time of year when a lot are themed towards Christmas and related subjects. For this, I stamped a snowman image straight onto the cards, then coloured in using a combo of Twinkling H2Os (there's a surprise!) and some Gelly Pens, which also have a lovely twinkle and a good coverage of pigment. Actually, although they are very simple, sometimes that works; I'm pleased with the final effect. Also made a little Christmas RAK for the lady organising the swap. I usually do this - it's a good way to say thank you, and I usually find that by the time I've done the cards for the given subject, I'm on a bit of a roll, so am happy to do one more.
The other cards are for a regular colour themed swap held each month. This month the theme was "My favourite colour". This stumped me a bit, as I love colour and have different favourites depending on the time of year, what it's for (I wouldn't wear bright orange but a bowl of clementines look glossy and wonderful) and so on. Anyway, after a lot of thought, I decided on purple. For one card, I covered it in glossy deep purple paper and trimmed the corners. Then applied some lovely embellishments featuring a vase of purple pansies and a butterfly. Quite simple but with strong colours, so it worked. The other card was one I had brayered with an inkpad called "Evening Enchantment" or something similar. The colours are shimmery lilac, green and blue. Over this, I used a layer of pearl embossing powder to emphasise the shimmery, dreamy quality. Corners rounded again, and then applied some more flowers and butterflies.
I've recently updated my ATC to-do list - it's pinned to my notice board and lets me keep track of swaps. On it I list the swap theme, the organiser, the deadline, number of cards needed or limited to, whether I have the address of the organiser and a tick when I do, and a section for any other notes or special instructions e.g. no peel off stickers is a common one. In this way, I can keep track of the swaps I do, as sometimes people have long closing dates and you can be doing cards a couple of months in advance, or more often quite close to the deadline. When I have the organiser's address, I usually write it on the envelope and stamp it, thus ensuring I have an incentive to make the deadline. By listing them like that it also ensures I keep an eye on the total number of swaps so I don't swamp myself when there's a lot going on or conversely I don't run dry. Receiving cards in the post is always a treat. Often they are also in pretty hand-made envelopes - it almost seems a pity to open them. When I've finished stroking them and admiring them and wondering "How did she do that?", I place them in a special folder. This has clear plastic pages with nine pockets on each page, ideal for storing the cards neatly and allowing me to view them easily. Then it's onto the computer and a thank you to the swapper - this is important - firstly out of gratitude and secondly as sadly cards are often stolen or go missing. The thinking on the forum is that it is assumed there is cash inside - many ladies actually write little messages on the envelopes saying things like "Artwork enclosed - no monetary value". After all that, it's time to have a cuppa and dream of the next swap.....

Friday 14 November 2008


Well, as promised, today I finished the minibook for our nephews. It's been a while, as we've been busy moving and getting settled (see my other blog for full info on this). Actually returning to crafting has been very therapeutic and I've really enjoyed doing it. Quick recap, this is to thank our nephews for Booty's birthday present of a squeaky rabbit toy which both she and Andy love playing with.
The little minibook is from the Brenda Pinnick Christmas kit I have, but there is no obvious Christmas printing, and the colours are not screamingly festive. When the boys play at shop, their premises are called "The Sunshine Dudes" - our oldest nephew thought up the title, and I think it's lovely.
Pictures show the book (I love the ribbon tie on it) and a few of the pages inside. It was a lot of fun to put together, and I hope the boys like it.

Sunday 26 October 2008


With our local evening paper on Friday evening, we received a brochure from Hobbycraft. A new store opened in Cardiff yesterday, and in the brochure was a voucher for £3 off if you spent £15. After a busy family day yesterday (see my other blog for pics and info) we trundled down there this afternoon. Enjoyable to have a good browse, although I was very shocked at the number of seemingly unattended small children that were roaming around. I bought some nice things which I am looking forward to using. One of the things that caught my eye was a pretty little kit of 15 blank pre-printed Christmas cards with a selection of co-ordinating embellishments, vellums, gems, diecuts, cord etc. In lovely silver and blue tones, it looked cool and elegant. For £6.99 I decided to treat myself and now I have made all 15 cards and bagged them for the GRW shop. So, a productive afternoon. The kit was by Papermania, and they had them in different colour ways e.g. red and gold if you wanted a more classic look. I have a box for cards for the GRW shop and it's now nearly full, so it will be sent off this week, I think.

Wednesday 22 October 2008


A post today on ATCs. But first, I should say that we had a wonderful time with my great aunt on the weekend and she loved her sampler. She's going to ask my dad to put up a picture hook for her next time he's round there, so it can be hung up besides where she sits to do her knitting. She also liked the little book I made her.


The ATCs illustrated are a set I made for a Docrafts swap on the theme of the rainbow. Each participant is requested to provide seven cards, one in each colour of the rainbow, to be decorated as desired. I love rainbows, and can remember my grandfather teaching me the colours of it when I was a little girl. Fortunately I was off to a good start with plenty of coloured blank cards and my trusty Twinkling H2Os. Each card was painted in the corresponding Twinkle, just to give it a good base. I love the subtle shimmer they produce. Then I decided to go with an oriental theme - no particular reason, just felt right. I used a variety of stickers, some backing papers covering half a card on some colours (green and violet) and plenty of adhesive gemstones (ah, bling, who can resist?). I also had some very pretty mini postcards and illustrations that I'd got ages ago that were just right for some of these. Photos attached and the cards were posted off this afternoon.
My next project will be for our nephews. They recently sent us some great cards for Andrew's birthday and for Booty's - as we don't know her actual date of birth, we celebrate it on the same day as her master. She also received a wonderful rabbit toy that she and Andy have been playing with enthusiastically. I decided to send the boys a couple of snaps of the dogs, and after printing them out, decided that as I had a couple of little minibooks still available, one of these would be perfect, and allow me to put in a couple of extra pics and maybe some funny text and a thank you note from Booty. So, I'll be starting that tomorrow.


Monday 20 October 2008


Photos illustrate latest ATC swap, from the monthly colour swap on Do crafts forum. This month it is Lavender and Lace. I made three cards for this. Using pale lavender base card, I painted two with a very pretty Twinkling h2o - virtually the same colour, but gives it a lovely shimmer effect. On one, I applied lavender vellum,attached with mini brads, and a lace effect adhesive border. On top is a very small picture I downloaded from the internet, matted on some purple card, and then glossed with 3D gloss and left to dry for several hours. The second one is again painted, with a self adhesive ribbon across one corner. On the base is a stuck purple patterned tag, from a K & Co kit, with another ribbon sparkling across on the join. In the middle is another image, again matted and glossed. The third card is left plain, with a velvet ribbon across it. Over this, I attached a tag from the same K & Co kit, which features a pattern of lavender coloured lace (perfect!), with a brad at the top. I also added another strip of sparkly adhesive ribbon at the bottom. These were posted today, and I can't wait to see what I receive back.

Friday 17 October 2008


Thought I'd do two separate posts tonight, rather than one massive one. After making the sampler and taking it to be framed, I got thinking. My great aunt had a special family birthday party about a week before the actual big day, as she was then going away for a fortnights holiday in Porthcawl. We went to the party and it was great fun, and she had the most amazing cake, made in a special knitting theme, with balls of wool and needles decorating the top of the cake, absolutely fantastic and beautifully made. Anyway, I took lots of photos and then decided to make a little mini-book of the party to go with the present.


I recently bought a Brenda Pinnick kit from QVC, which is the sister kit to one I already own, which is a Christmas themed kit. This one is a more general one and adaptable for lots of different occasions. It contains a large scrapbook and three smaller ones - and that's what I decided to use. A small kit, which you make up yourself of a paper pleated bound book, with covers and ten pages, perfect for this type of small project. The kit also contains lots of chipboard letters, shapes, stickers, card etc, so I had lots of fun making it up. I left the last page blank and when the sampler came back from the framer yesterday, I put the photo in the back with suitable embellishments. Some pictures attached. I really enjoyed making this little book, and I hope my aunty likes it too, as a special reminder of her party and her fabulous cake. I am going to wrap both the picture and the book tomorrow morning, and will probably do a quick photo of them then. Again from QVC (yes, I know this is turning into a commercial) I recently purchased a little set of twelve different themed gift wrap sets for only £14. This was wonderful value, as in each set, there is a gorgeous gift bag, lots of tags, tissues, gift wrap, ribbon, certificate holders, etc etc. All are top quality and most attractive, so I will be using the Blue Hydrangea set tomorrow morning to create an inviting gift. I'll report back on how it goes.


Lots to write about and show tonight. A much loved great aunt was 90 very recently. I dithered for some time about what to get her. Apart from being a very keen knitter, she leads a very simple life. She'd already told my mother that she had drawers full of gift toiletries, doesn't particularly like plants and as she's very mildly diabetic, isn't supposed to have chocolates etc (not that that stops her very much!). Some relatives were getting her M & S vouchers - she does enjoy shopping, but I recalled that she loves receiving cross stitched and handmade cards. Quite often when we go to visit, the cards will be up for a while as she enjoys looking at them, and as she knits, appreciates the craft behind them so to speak. She had previously given me some embroidery threads, so it was a choice between something cross stitched or a home made quilt. In the end, I decided to make a pretty sampler, that I had quite fancied myself, from a design by the late Sheila Hudson. I've stitched several of her pieces over the years - she mainly did floral pieces and nearly all without any backstitch, and usually without fractionals, which although I can do, I really am not too keen on. The pattern was from Cross Stitcher April 2004.


The sampler is stitched on a pale lavender aida fabric, and I used a variegated pink thread for the lettering on the bottom. When it was finished, it was washed and pressed and then I took it to the framer. Picked it up yesterday and am very pleased with it. The frame is a light simple one, with a limewash finish. I wanted to go with a light, almost rustic feel. Anything more complex would have looked fussy, I think. The glass is non-reflective.


On a side note, I try and always wash all but the very smallest pieces of cross-stitch before pressing and finishing. This ensures the removal of any oils or grease from my hands. I use a product from Lakeland, a lavender scented wash for delicates, that does not require rinsing. It's perfect for the light hand wash in warm water I give to my stitching. The fabric is then gently squeezed and placed to dry on a soft white towel. I then iron it gently to remove any creases. Going through this ritual ensures the fabric and stitches look, smell and feel at their best. The fragrance is very delicate and pleasant. Stitching this sampler was very enjoyable, and I really hope my auntie likes it when we give it to her tomorrow.

Sunday 12 October 2008


I'm appalled that it's been so long since I posted. Apologies. A short one tonight. A greyhound friend asked me to make an 18th birthday card for a young man. I don't know anything about his tastes, hobbies or preferences, so went for something simple. I used a single piece of square card from DCWV, from a new box (along with lots of scalloped and ric rac cards) as the base. On the front, I applied some self adhesive ribbon with a fleur de lys design, and on top a small rectangle of green crackled paper, topped with a die cut and glittered key (traditional coming of age symbol). Above that, I simply applied die cut figures to show 18, and edged the card with a gold inkpad. On the reverse, I cut out a square of Anna Griffin paper, mounted it, then matted a smaller square of plain cream paper and stamped Happy Birthday using a multi coloured inkpad. A green ribbon was attached to the top of the card in case the recipient wants to hang it up.

Photos attached.

Wednesday 30 July 2008


Apologies for the delay in posting. Not much craft related activity to report, as it's been hot sunny weather. One of Andrew's colleagues is having a pretty tough time at the moment - she's just lost her beloved grandmother, has been in hospital and is in the process of house moving/building. So he asked me to make her a little card to say thinking of you. Photo attached. I made it from a wonderful kit I got ages ago from QVC - an enormouse K & Co box, which seems to be bottomless, with two scrapbooks, masses of papers, vellums, die cuts and greetings cards. It must be one of the best value things I have ever bought. I used one of the scrapbooks to make the recent one for my inlaws' wedding anniversary, and was lavish with my use of paper and embellishments, but it hardly seems to have dented it. The designs are really pretty too. For this card, I used a green greeting card, with a simple check on it. Above was a pretty vellum with glittered daisies. A die cut card ribbon placed across (disguising tape used to adhere vellum) with a bouquet of daisies, bee and ladybird die cut and a small panel to say Thinking of You, with daisies in the corner. It looks fresh and pretty and I hope she likes it.

Tuesday 1 July 2008


The first week in July is a busy time for Andrew's sister and her family. Firstly, it's Basil's birthday (her husband). Then it's their wedding anniversary, and on the same day their third son Alex was born. This in turn means a bumper crop of cards.
Basil first. I took a dark old gold card and mounted on it a piece of K & Co paper, with an attractive green and gold foiled print, but not too loud. On top of that, I took four little squares of cream card and stamped them with Anna Griffin clear stamps, two of a beehive and two of an individual bee. The squares were outlined with green ink, then matted and layered on coloured card. These were then fixed to the front of the card and at the bottom I matted up two small pieces of card with a Happy Birthday greeting and then for the piece de resistance, used some shrink plastic to make a mini bee which was fixed to the greeting. This was my first foray into using shrink plastic for a proper card and I was quite pleased with it. Basil's father used to keep bees so I am hoping he will like it.
Alex's card is more of a testament to my ongoing love for K & Co products, and also the lovely way they can intermix. The base card is one that I bought from a set that arrived this morning, of a variety of K & Co prints. The blue I selected was from a set I recognised. On the card I then applied a mini folded pocket from a huge accessory kit I bought ages ago (another K & Co one) and the colours were perfect with lots of faded greens and blues. I picked out the name Alex using blue chipboard letters (originally purchased for holiday scrapbooks). A small 3D flower shape in blue was added to the front of the pocket. Inside the pocket, I took a coloured ATC blank and used a tag template to cut out a neat shape. A hole was punched in the top and then I brayered the card with a pretty inkpad in greens and blues. On this I immediately applied pearl embossing powder and heated it to give a smooth glassy finish. I tied the hole with a ric rac green ribbon and applied a Happy Birthday sticker to the front of the card, before replacing in the pocket. All the colours work very well together and I'm very pleased with the card, and hope Alex likes it. The pictures attached show the card and then with the tag removed from the pocket.
As I haven't yet finished the anniversary card, I'll write about that when it's complete, which should be tomorrow.

Friday 27 June 2008


A quick post on my most recent ATCs for a Docrafts swop. The theme was William Shakespeare, quotes from, which initially I thought would be easy as of course he was a master who produced reams of quotable lines and couplets. However, when I got into the research, I found it was more difficult than I was expecting for two reasons. Firstly, I wanted to include the text on the card, so I couldn't have anything too long as an ATC is a small environment. Secondly, manyof the beautiful and colourful similes and metaphors do not easily lend themselves to simple images - they were too complex and rich for my pea like brain.
Eventually I settled on two. The first was from Macbeth and is the quote from the witches - "Double double, toil and trouble, let the cauldron boil and bubble". It would have been wonderful to have included the famous spell recipe with eye of newt etc but that would be far too big for a single card. I used a dark blue base card which was painted with cobalt blue Twinkling H20 to give it a real depth and glimmer. Then used some DCWV chipboard stickers of mystic themes/images. On the base, a print out of the quote mounted on mirror card and affixed. Finally, clear crystal gems to give accents in the top and bottom.
The second quote is by Portia in the final act of The Merchant of Venice and is about a good deed being a candle in a naughty world. For this I got out my Twinkling H2Os and started with a deep cobalt blue background. The candle is in Oyster, with a Celestial yellow flame, and around it I did a variety of irridescent colour beams (gold, violet, red). Finally, when the paints were dry, I used my glue pen to outline the candle and lines between the flames and applied a bronze glitter. The quote was then affixed to the bottom of the card.
As a Thank you to the lady organising the swop, I made her a RAK. On a blue card base, I stuck on some pale blue Anna Griffin paper. In the bottom corner, a sticker saying "Hope". Across the middle, a brown and blue spotted ribbon, with a flower attached by a brown mini-brad. Very simple, but I think very effective, with pretty, clean colours.
Next challenge, a medieval themed swop.

Wednesday 25 June 2008


Here I am again. I took advantage of the intermittent sunshine this afternoon to take some photos of the scrapbookout in the garden. The thinking was that the light would be good, and it would avoid the need for flash, which tends to bounce off things when I photograph crafty things indoors. So it was a good opportunity to experiment. I've attached some photos of a few of the pages and the album itself. While I was out there, I got on a roll, and photographed a few plants and have put those up on my other blog.


The postman brought two ATCs today from the Turquoise swop on Docrafts - lovely. Also had a delighted thank you from my friend's daughter, for whom I'd made a Gothic maze book. I posted it yesterday, and it arrived this morning safely, and she's thrilled with it, which is such a good feeling.

Tuesday 24 June 2008

On Saturday I went to another craft workshop at Inkspot, our local craft store. This one was on using shrink plastic - a technique I have wanted to try for a while but have been a bit nervous of attempting. Our lovely tutor was able to give us lots of attention as there were only two of us there, and I was able to make three presentable cards, each featuring shrink pieces on the front in a variety of different shapes, colours and sizes. I now feel more confident about trying out some of these at home, and think they could make some stunning Christmas cards, so will report back if attempts are successful.

This coming Saturday, there is a workshop on making star and other shaped cards with a possibility of also doing waterfall cards. I have never made a waterfall card, although I was very tempted by a kit on QVC this afternoon, which featured waterfall, lantern and wonderful exploding boxes. After a lot of dithering I eventually succumbed to some K & Co (now, there's a surprise) greeting cards.

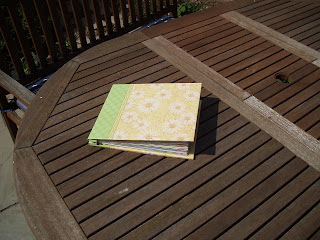
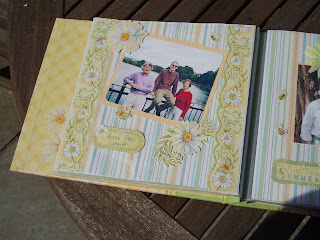
What I have been particularly busy with lately is a mini scrapbook, now complete, which I have put together for Andrew's parents. It's their wedding anniversary in August, and we have lots of nice digital images of them, taken when they visit us or vice versa. This mini scrapbook came with a K & Co kit, which I really wanted for the paper, diecuts and cards, and I'd had it on the shelf for ages while I wondered what to do with it. Eventually inspiration struck, and I gathered together a selection of photos, including scanning some older ones, even one of their wedding day back in the 1960s. Gradually the page layouts came together, with a lot of the K & Co papers working well, but I also used some lovely Anna Griffin ones. To my surprise, these blended remarkably well with the others, with a soft palette of sage greens, creams and wedgewood blues working well with the slightly brighter vintage pastels of the original kit. I am going to try to photograph the pages in daylight, and if this is successful, will post here. I'm really thrilled with the way it has turned out - some really attractive pictures. Andrew had a look at the finished item and thinks his mother will love it. The actual album itself is very pretty with a soft yellow cover, green check trim and a design of crisp daisies. Each page is 8.5 x 8.5" which is a nice size to work with, allowing one reasonably sized photo per page, with room for plenty of embellishments, labels and trims. I think this will be a lovely gift for them and I'm personally delighted with it. Scrapbooking is not something I've done much of before, but I can see how it can be very enjoyable and worthwhile especially for special themed books like this.

Monday 16 June 2008


As promised, an update on the Fathers day card I made for my FIL. On June 7th I went to a craft workshop at Inkspot on using Fantasy Film and Fantasy Fibre, and was eager to incorporate one or the other. Fantasy Film didn't lend itself to any obvious themes for him, so I decided to make a card decoration out of Fantasy Fibre. After the workshop, I had bought two little pots of the Fibre, one in a pretty lilac and the other in a lovely deep bronze/green colour. That seemed to be promising, and I had in my card stock a nice deep bronze square card and envelope. So I made a kind of random shape with the fibre and used it as a backing for the centrepiece. With the strong colours and textures, I decided that a simple approach would be best. As you can see from the picture I layered an initial R (his name is Roger) on some layered cardstock, with small brads in the corners. The coloured card is mounted on Mirri board to give it a bit of pzazz. I was pleased with the finished article.
My next workshop is this coming Saturday, again at Inkspot, when I'm booked in for a session on Shrink Plastic. It looks a fascinating technique but I am a bit nervous of trying it, so hopefully a session with a tutor will be the equivalent of stabilisers on a bike.
Some other good news - Busy Bees called during the week. They have a series of one and half day quilting workshops over the summer, after their main class programme has finished. One of these is a half day session about making a chicken. I had put my name down for it when I was attending classes, but the list had filled. However, the session was proving so popular that they were considering holding an overflow class. Fortunately, this is now the case and I'll be attending in August. My DH was rather bemused to give the message "The chicken is GO" but he's used to me now, after nearly eleven years and has learned not to be surprised by many things.

Thursday 5 June 2008


Some delays since last posting but I have not been idle. Cross-stitch first. I have started work on a lovely sampler which has been calling to me for a couple of years. It's from Cross stitcher magazine, and is designed by the late Sheila Hudson. Generally I love her designs and have stitched several smaller ones in the past. She usually designs beautiful flowers and one of her characteristics is that her designs generally use only whole stitches and virtually no backstitch, fractionals or French knots. This particular design is called Potpourri and features several flowers that make up a typical bowl. I am stitching it on pale lilac aida, which works well with the colours in the design, and when complete it will be framed and probably put in our bedroom. I will post pics as it progresses and of course when it is complete.


ATCs. Some photos attached of latest swops. Local Heritage, and the monthly colour swop which for June is Turquoise. I enjoyed doing the Turquoise ones as I had lots of material to work with. Both cards were painted with a light layer of Twinkling H2Os in Navaho Pearl which gives them a subtle shimmer. I also show a roses design RAK for the organiser.
For local heritage, I worked with the Millennium Centre in Cardiff, Brains brewery and Felinfoel ales in Llanelli. Brains sponsor the Welsh rugby team, and their brewery is still in the centre of Cardiff right by the railway station. If I take Andrew in to the station to catch a London train early in the morning, the air is filled with the most delicious malty smell around the brewery. Felinfoel Double Dragon is one of the first beers I ever drank, and very local indeed to my upbringing. No comments on the alcoholic theme emerging!! A blue butterfly RAK for the lady organising the swop is also shown.

Card making - I've been busy making a lot more for greyhounds, to boost depleted stock levels. Next challenge will be a Fathers Day card for my FIL.

Saturday 17 May 2008


Had fun today making some ATCs. The theme was witchcraft, wiccan and spells, so was enjoyable to do. I did a bit of reading on the net to get me in the mood and give some ideas. The photos show what I came up with. I made four. The first was a blue card which I then embossed using a Moonglow embossing powder to give a beautiful high gloss finish in a stunning blue colour. Over this I layered a lovely picture I found on the internet of two dragons entwined round a pentagram in blue and green. This was printed, glazed using a Sakura Glaze pen and the edges were coloured using ablue ink pad. It was attached to the card and each corner was fastened by a small blue brad. Finally on each side I affixed three green gems (to represent the Rule of Three, an important principle in Wiccanism). I am very pleased with this one.
Secondly, I used a brown base card which I then painted with a brown Twinkling H2O, to give a slight sheen. An adhesive ribbon was attached, coloured brown with a Celtic knot design. I wrote the words "Wiccan Magick" across the card with an embossing pen, and powdered these with a holographic embossing powder. A circular piece of card was coloured gold using an ink pad, and then I drew a pentagram with a Sakura pen. Iwent over this with the embossing pen and used a wine embossing powder. This stuck to some of the gold ink but I was pleased with the effect. Finally, went over the lines again with a black glitter glue and fixed the circle to the card.
Thirdly, I used a pinky lilac card, and double embossed it. This is where you pour embossing powder on to the molten surface of a heated card being embossed - it gives a lovely effect. Two corner die cuts were applied, and then two chipboard pieces from the recent set I bought from QVC. The picture is of spells and potions, and the text reads "Magic". The colours all work together very well.
The final card is a deep rose pink base with gold peel offs forming an inner border. I found an attractive Secessionist picture on the net of pagan maidens dancing so printed it out and applied Sakura Glaze to it. After attaching to the card, I fixed the corners with small deep rose brads. A simple card, but effective. Working on these themes today has also been very fruitful for the maze book I want to make for Sarah. I will post more on this as it develops.